Resource Based Policy
This article explains IAM resource-based policies in AWS, focusing on S3 bucket policies and their key components.
In this lesson, we explore how IAM resource-based policies work in AWS, focusing on S3 bucket policies. Resource-based policies are attached directly to resources—such as S3 buckets—to specify which AWS principals can perform actions on them.
Key Components of a Resource-Based Policy
| Element | Description |
|---|---|
| Version | Defines the policy language version (e.g., 2012-10-17). |
| Statement | Contains one or more permission statements. |
| Principal | Specifies the AWS entity (user, role, account, or group) to which the policy applies. |
| Effect | Indicates whether to Allow or Deny specified actions. |
| Action | Lists AWS operations (for example, s3:DeleteObject). |
| Resource | Defines the ARN(s) of the target resource(s). |
Example: Explicit Deny in an S3 Bucket Policy
The following policy blocks the accounting group from deleting objects or the bucket itself in the accounting1 S3 bucket:
```json theme={null} { "Version": "2012-10-17", "Statement": [ { "Effect": "Deny", "Principal": { "AWS": "arn:aws:iam::123456789:group/accounting" }, "Action": [ "s3:DeleteBucket", "s3:DeleteObject" ], "Resource": [ "arn:aws:s3:::accounting1", "arn:aws:s3:::accounting1/*" ] } ] }
<Callout icon="triangle-alert" color="#FF6B6B">
Explicit denies always override any allows. Ensure you review all policies for unintended deny statements.
</Callout>
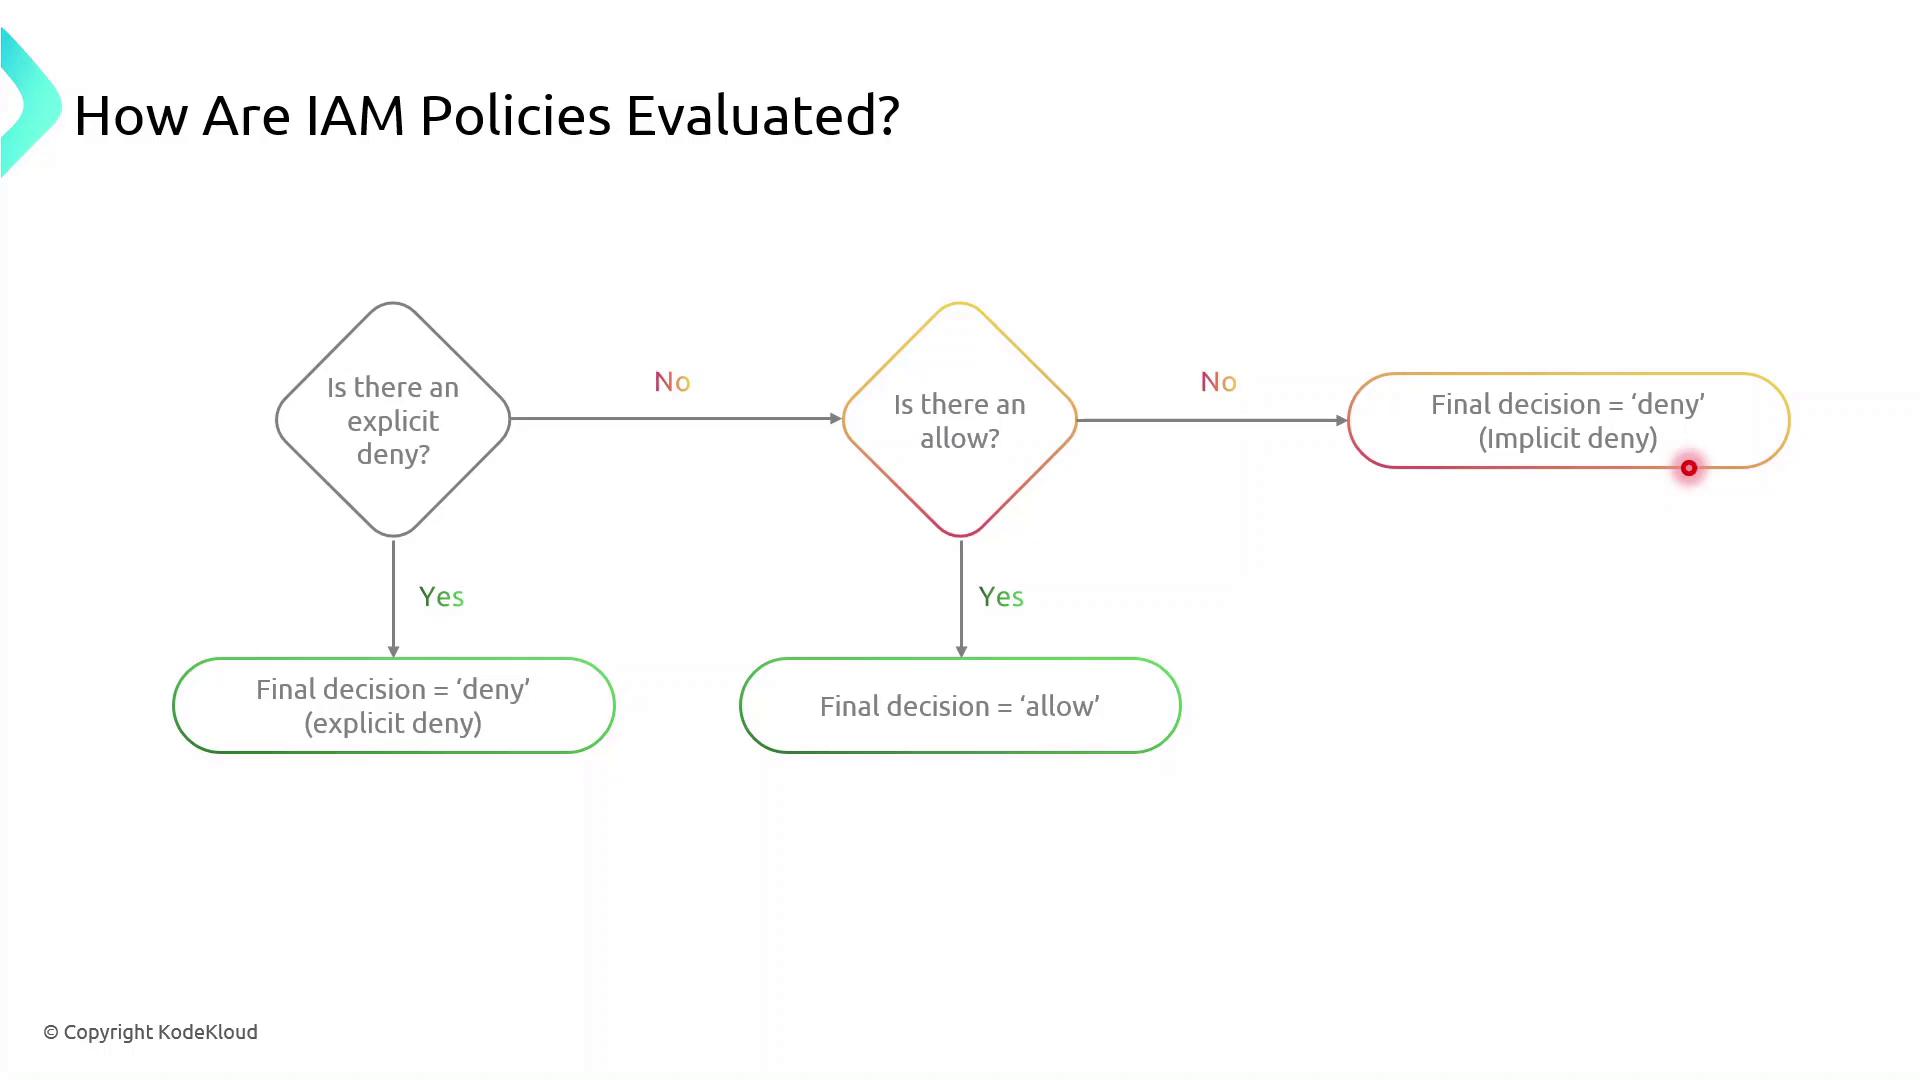
## IAM Policy Evaluation Logic
When multiple statements or policies apply to a request, AWS evaluates them in this order:
| Order | Evaluation Step | Outcome |
| ----- | ------------------------ | ------------------------------ |
| 1 | Explicit Deny present | Request is denied immediately. |
| 2 | Explicit Allow (no Deny) | Request is granted. |
| 3 | Neither Deny nor Allow | Request is implicitly denied. |
<Frame>
</Frame>
<Callout icon="lightbulb" color="#1CB2FE">
Implicit denies occur when no policy explicitly allows an action. You must explicitly allow all required operations.
</Callout>
## Creating and Attaching Your S3 Bucket Policy
Follow these steps to apply a resource-based policy to an S3 bucket:
1. Sign in to the AWS Management Console.
2. Open the IAM service and choose **Policies**.
3. Click **Create policy**, then select **JSON**.
4. Paste your policy document and review.
5. Attach the policy to the target S3 bucket under the **Permissions** tab.
<Callout icon="lightbulb" color="#1CB2FE">
Make sure you have the necessary IAM permissions to create and attach policies. Failure to do so will result in authorization errors.
</Callout>
## References
* [Amazon S3 Bucket Policies](https://docs.aws.amazon.com/AmazonS3/latest/userguide/example-bucket-policies.html)
* [AWS IAM Policy Documentation](https://docs.aws.amazon.com/IAM/latest/UserGuide/access_policies.html)
---
> This tutorial explains how to attach a resource-based policy to an S3 bucket using the Policy Generator in AWS.
In this tutorial, we’ll walk through attaching a resource-based policy to an existing S3 bucket in your AWS account. You’ll learn how to use the **Policy Generator**, customize the JSON, and apply it to grant fine-grained access.
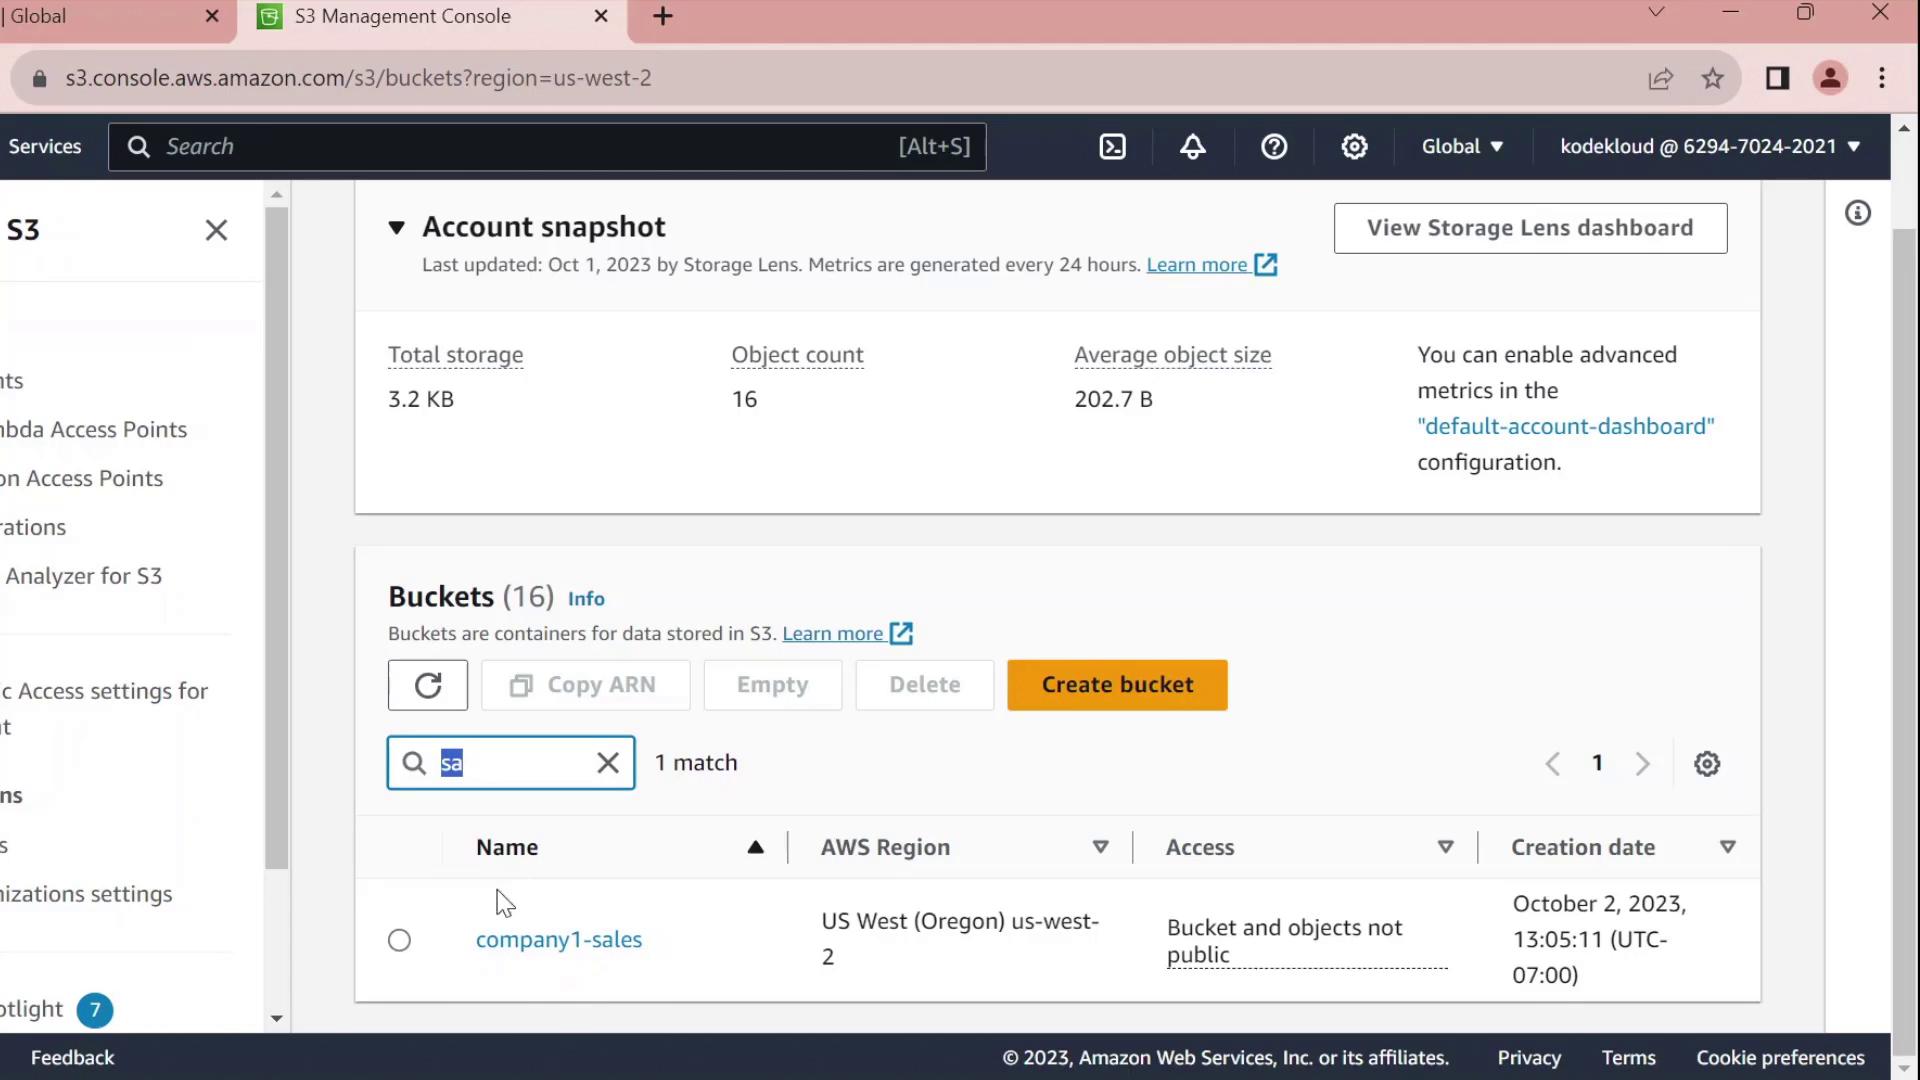
## 1. Navigate to the S3 Console
1. Open the AWS Management Console and go to **S3**.
2. Click **Buckets** and use the filter to find **company1-sales**.
<Frame>
</Frame>
3. Select **company1-sales** and switch to the **Permissions** tab.
4. Scroll to **Bucket policy** and click **Edit**.
5. At the top of the editor, choose **Policy Generator** instead of writing raw JSON.
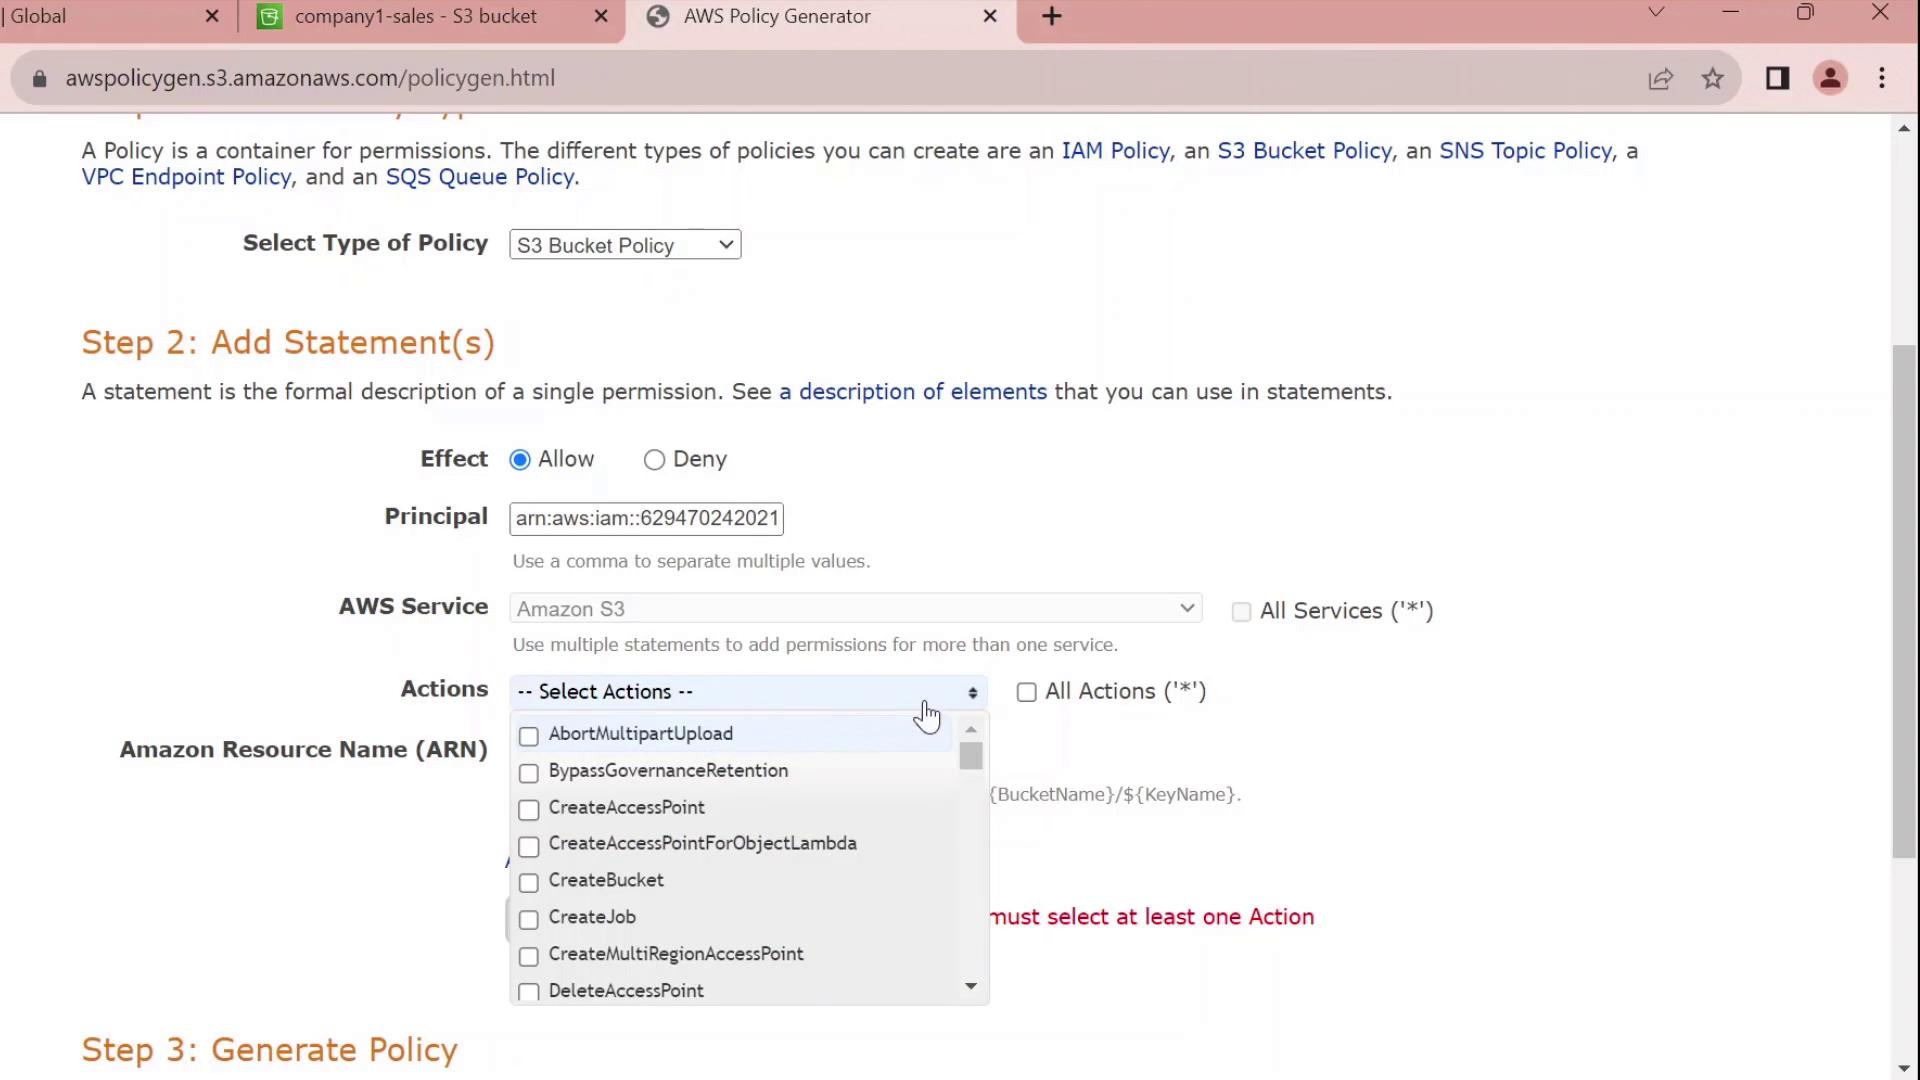
## 2. Generate a Bucket Policy
In the **Policy Generator** form:
| Field | Value |
| --------- | ----------------------------------- |
| Effect | Allow |
| Principal | arn:aws:iam::629470242021:user/john |
| Service | S3 |
| Actions | All Actions (`s3:*`) |
| Resource | arn:aws:s3:::company1-sales |
Click **Add Statement**, then **Generate Policy**.
<Frame>
</Frame>
## 3. Review and Customize the JSON
The generator outputs a JSON policy similar to this:
```json theme={null}
{
"Id": "Policy1696277356902",
"Version": "2012-10-17",
"Statement": [
{
"Sid": "Stmt1696277354841",
"Effect": "Allow",
"Principal": {
"AWS": [
"arn:aws:iam::629470242021:user/john"
]
},
"Action": "s3:*",
"Resource": "arn:aws:s3:::company1-sales"
}
]
}
Customize the Statement ID
Replace the auto-generated SID with something meaningful, for example JohnFullAccessToCompany1SalesBucket:
json  theme={null}
{
  "Id": "Policy1696277356902",
  "Version": "2012-10-17",
  "Statement": [
    {
      "Sid": "JohnFullAccessToCompany1SalesBucket",
      "Effect": "Allow",
      "Principal": {
        "AWS": "arn:aws:iam::629470242021:user/john"
      },
      "Action": "s3:*",
      "Resource": "arn:aws:s3:::company1-sales"
    }
  ]
}
GetObject, PutObject), add the ARN arn:aws:s3:::company1-sales/* to the Resource array.
4. Apply the Policy
- Copy the finalized JSON.
- Paste it into the Bucket policy editor.
- Click Save changes.
You’ve now successfully attached a resource-based policy that grants the IAM user john full control over the company1-sales bucket.
Policy Statement Elements
| Element | Description | Example |
|---|---|---|
| Sid | Unique identifier for the statement | JohnFullAccessToCompany1SalesBucket |
| Effect | Allow or Deny the action | Allow |
| Principal | The IAM user, role, or service | arn:aws:iam::629470242021:user/john |
| Action | The S3 operations permitted | s3:* |
| Resource | The bucket or object ARNs | arn:aws:s3:::company1-salesarn:aws:s3:::company1-sales/* |